GitOps CI/CD on AWS with Terraform
GitOps is an operational model that combines Infrastructure as Code (IaC), Merge Request (Pull Request) workflows, and automated CI/CD pipelines. Under GitOps, your Git repository serves as the single source of truth for your infrastructure definition.
This step-by-step beginner tutorial guides you through setting up a complete, hands-on GitOps workflow on AWS using Terraform, AWS CodePipeline, AWS CodeBuild, and AWS CodeCommit.
Architecture Overview & GitOps Principles
In a traditional setup, engineers provision cloud infrastructure manually or run deployment commands directly from local terminals using administrative credentials. GitOps replaces manual access with an automated, audit-ready workflow:
- Infrastructure as Code (IaC): Infrastructure components (VPCs, subnets, firewalls, load balancers, EC2 servers) are defined declaratively using Terraform code (
main.tf,variables.tf). - Git as Single Source of Truth: All infrastructure changes live in Git. If an environment breaks, executing
git revertquickly restores infrastructure to the previous stable state. - Strict Security & Merge Flow: Developers do not require direct AWS deployment permissions. They submit code changes via Pull Requests (PRs), which senior engineers review before merging into
masterbranch. - Automated CI/CD Deployment: Merging code into
masterbranch automatically triggers AWS CodePipeline and AWS CodeBuild to validate code syntax and automatically execute terraform apply.
Step 1: Prerequisites & Infrastructure Code Setup
Before running the following steps, ensure you have:
- Terraform (version > 0.12 installed).
- Use this link to install Install | Terraform | HashiCorp Developer
- An AWS S3 bucket to store remote Terraform state files (
backend "s3").
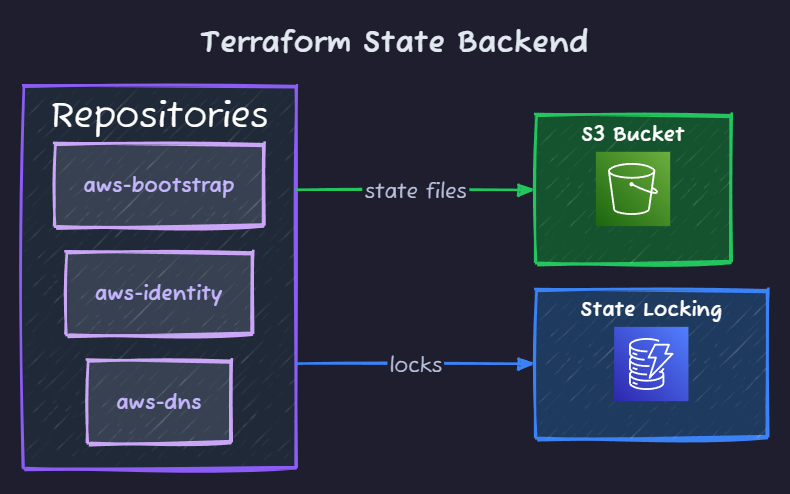
- An AWS CodeCommit repository named
gitops-terraformor any other name you want for the AWS CodeCommit repository.

1. Define variables.tf
Create variables.tf to store dynamic deployment parameters such as AWS regions and resource tags.
2. Define main.tf
Create main.tf in your local directory with your backend, AWS provider, target network, load balancer, and CI/CD resources:
terraform {
  required_version = ">= 1.10.0"

  # Create this S3 bucket before running terraform init.
  # S3 native state locking (use_lockfile) requires Terraform 1.10+.
  backend "s3" {
    bucket       = "replace-with-an-existing-unique-state-bucket"
    key          = "gitops-web/terraform.tfstate"
    region       = "us-east-1"
    encrypt      = true
    use_lockfile = true
  }

  required_providers {
    aws = {
      source  = "hashicorp/aws"
      version = "~> 6.0"
    }
  }
}

provider "aws" {
  region = var.aws_region

  default_tags {
    tags = {
      Project     = var.project_name
      Environment = var.environment
      ManagedBy   = "Terraform"
    }
  }
}

# -------------------------------------------------------------------
# Input variables
# -------------------------------------------------------------------

variable "aws_region" {
  description = "AWS region in which to deploy the infrastructure."
  type        = string
  default     = "us-east-1"
}

variable "project_name" {
  description = "Short project name used in resource names and tags."
  type        = string
  default     = "gitops-web"
}

variable "environment" {
  description = "Deployment environment."
  type        = string
  default     = "dev"

  validation {
    condition     = contains(["dev", "test", "prod"], var.environment)
    error_message = "environment must be dev, test, or prod."
  }
}

variable "vpc_cidr" {
  description = "IPv4 CIDR block for the VPC."
  type        = string
  default     = "10.20.0.0/16"
}

variable "instance_type" {
  description = "EC2 instance type for the demonstration web server."
  type        = string
  default     = "t3.micro"
}

# -------------------------------------------------------------------
# Availability Zones and Amazon Linux 2023 AMI
# -------------------------------------------------------------------

data "aws_availability_zones" "available" {
  state = "available"
}

data "aws_ssm_parameter" "amazon_linux_2023_ami" {
  name = "/aws/service/ami-amazon-linux-latest/al2023-ami-kernel-default-x86_64"
}

locals {
  availability_zones = slice(data.aws_availability_zones.available.names, 0, 2)
}

# -------------------------------------------------------------------
# Networking: VPC, public subnets, Internet Gateway and routes
# -------------------------------------------------------------------

resource "aws_vpc" "main" {
  cidr_block           = var.vpc_cidr
  enable_dns_support   = true
  enable_dns_hostnames = true

  tags = {
    Name = "${var.project_name}-vpc"
  }
}

resource "aws_internet_gateway" "main" {
  vpc_id = aws_vpc.main.id

  tags = {
    Name = "${var.project_name}-igw"
  }
}

resource "aws_subnet" "public_a" {
  vpc_id                  = aws_vpc.main.id
  cidr_block              = cidrsubnet(var.vpc_cidr, 8, 1)
  availability_zone       = local.availability_zones[0]
  map_public_ip_on_launch = false

  tags = {
    Name = "${var.project_name}-public-a"
    Tier = "public"
  }
}

resource "aws_subnet" "public_b" {
  vpc_id                  = aws_vpc.main.id
  cidr_block              = cidrsubnet(var.vpc_cidr, 8, 2)
  availability_zone       = local.availability_zones[1]
  map_public_ip_on_launch = false

  tags = {
    Name = "${var.project_name}-public-b"
    Tier = "public"
  }
}

resource "aws_route_table" "public" {
  vpc_id = aws_vpc.main.id

  route {
    cidr_block = "0.0.0.0/0"
    gateway_id = aws_internet_gateway.main.id
  }

  tags = {
    Name = "${var.project_name}-public-rt"
  }
}

resource "aws_route_table_association" "public_a" {
  subnet_id      = aws_subnet.public_a.id
  route_table_id = aws_route_table.public.id
}

resource "aws_route_table_association" "public_b" {
  subnet_id      = aws_subnet.public_b.id
  route_table_id = aws_route_table.public.id
}

# -------------------------------------------------------------------
# Security groups
# -------------------------------------------------------------------

resource "aws_security_group" "alb" {
  name        = "${var.project_name}-alb-sg"
  description = "Allow public HTTP traffic to the Application Load Balancer."
  vpc_id      = aws_vpc.main.id

  ingress {
    description = "HTTP from the internet (use HTTPS for production)."
    from_port   = 80
    to_port     = 80
    protocol    = "tcp"
    cidr_blocks = ["0.0.0.0/0"]
  }

  egress {
    description = "Allow outbound traffic from the load balancer."
    from_port   = 0
    to_port     = 0
    protocol    = "-1"
    cidr_blocks = ["0.0.0.0/0"]
  }

  tags = {
    Name = "${var.project_name}-alb-sg"
  }
}

resource "aws_security_group" "web" {
  name        = "${var.project_name}-web-sg"
  description = "Allow HTTP traffic only from the Application Load Balancer."
  vpc_id      = aws_vpc.main.id

  ingress {
    description     = "HTTP from the ALB security group."
    from_port       = 80
    to_port         = 80
    protocol        = "tcp"
    security_groups = [aws_security_group.alb.id]
  }

  egress {
    description = "Allow outbound traffic for package installation and updates."
    from_port   = 0
    to_port     = 0
    protocol    = "-1"
    cidr_blocks = ["0.0.0.0/0"]
  }

  tags = {
    Name = "${var.project_name}-web-sg"
  }
}

# -------------------------------------------------------------------
# EC2 instance role: Systems Manager access without SSH
# -------------------------------------------------------------------

data "aws_iam_policy" "ssm_managed_instance_core" {
  arn = "arn:aws:iam::aws:policy/AmazonSSMManagedInstanceCore"
}

resource "aws_iam_role" "ec2_ssm" {
  name = "${var.project_name}-ec2-ssm-role"

  assume_role_policy = jsonencode({
    Version = "2012-10-17"
    Statement = [
      {
        Effect = "Allow"
        Principal = {
          Service = "ec2.amazonaws.com"
        }
        Action = "sts:AssumeRole"
      }
    ]
  })
}

resource "aws_iam_role_policy_attachment" "ec2_ssm" {
  role       = aws_iam_role.ec2_ssm.name
  policy_arn = data.aws_iam_policy.ssm_managed_instance_core.arn
}

resource "aws_iam_instance_profile" "web" {
  name = "${var.project_name}-web-instance-profile"
  role = aws_iam_role.ec2_ssm.name
}

# -------------------------------------------------------------------
# EC2 web server
#
# This is a deliberately simple single-instance demonstration.
# For production, use a Launch Template and Auto Scaling Group across
# private subnets, with controlled outbound access (NAT/VPC endpoints).
# -------------------------------------------------------------------

resource "aws_instance" "web" {
  ami                         = data.aws_ssm_parameter.amazon_linux_2023_ami.value
  instance_type               = var.instance_type
  subnet_id                   = aws_subnet.public_a.id
  vpc_security_group_ids      = [aws_security_group.web.id]
  associate_public_ip_address = true
  iam_instance_profile        = aws_iam_instance_profile.web.name

  metadata_options {
    http_endpoint               = "enabled"
    http_tokens                 = "required"
    http_put_response_hop_limit = 1
  }

  user_data_replace_on_change = true

  user_data = <<-USERDATA
    #!/bin/bash
    set -euxo pipefail

    dnf install -y httpd curl
    systemctl enable --now httpd

    TOKEN=$(curl --fail --silent --show-error \
      -X PUT "http://169.254.169.254/latest/api/token" \
      -H "X-aws-ec2-metadata-token-ttl-seconds: 21600")

    INSTANCE_ID=$(curl --fail --silent --show-error \
      -H "X-aws-ec2-metadata-token: $TOKEN" \
      http://169.254.169.254/latest/meta-data/instance-id)

    cat > /var/www/html/index.html <<HTML
    <!doctype html>
    <html>
      <head><title>GitOps Web Application</title></head>
      <body>
        <h1>GitOps Web Application</h1>
        <p>Hosted on EC2 instance: $INSTANCE_ID</p>
      </body>
    </html>
    HTML
  USERDATA

  depends_on = [
    aws_route_table_association.public_a,
    aws_iam_role_policy_attachment.ec2_ssm
  ]

  tags = {
    Name = "${var.project_name}-web-server"
    Tier = "application"
  }
}

# -------------------------------------------------------------------
# Application Load Balancer, target group and HTTP listener
# -------------------------------------------------------------------

resource "aws_lb" "web" {
  name               = "${var.project_name}-alb"
  internal           = false
  load_balancer_type = "application"

  security_groups = [aws_security_group.alb.id]
  subnets = [
    aws_subnet.public_a.id,
    aws_subnet.public_b.id
  ]

  enable_deletion_protection = false

  tags = {
    Name = "${var.project_name}-alb"
  }
}

resource "aws_lb_target_group" "web" {
  name        = "${var.project_name}-tg"
  port        = 80
  protocol    = "HTTP"
  target_type = "instance"
  vpc_id      = aws_vpc.main.id

  health_check {
    enabled             = true
    protocol            = "HTTP"
    path                = "/"
    matcher             = "200"
    interval            = 30
    timeout             = 5
    healthy_threshold   = 2
    unhealthy_threshold = 3
  }

  tags = {
    Name = "${var.project_name}-target-group"
  }
}

resource "aws_lb_target_group_attachment" "web" {
  target_group_arn = aws_lb_target_group.web.arn
  target_id        = aws_instance.web.id
  port             = 80
}

resource "aws_lb_listener" "http" {
  load_balancer_arn = aws_lb.web.arn
  port              = 80
  protocol          = "HTTP"

  default_action {
    type             = "forward"
    target_group_arn = aws_lb_target_group.web.arn
  }
}

# -------------------------------------------------------------------
# Outputs
# -------------------------------------------------------------------

output "alb_dns_name" {
  description = "Public DNS name of the Application Load Balancer."
  value       = aws_lb.web.dns_name
}

output "web_instance_id" {
  description = "ID of the demonstration EC2 web server."
  value       = aws_instance.web.id
}

output "aws_region" {
  description = "AWS region used for this deployment."
  value       = var.aws_region
}

output "web_url" {
  description = "HTTP URL for the demonstration web application."
  value       = "http://${aws_lb.web.dns_name}"
}
Step 2: Bootstrap Initial AWS Resources Locally
To establish the initial CI/CD pipeline and baseline AWS infrastructure, run Terraform locally once. After this bootstrap step, manual terminal deployment commands are no longer executed.
Execute these shell commands from your terminal:
# 1. Initialize Terraform plugins and S3 remote backend
terraform init

# 2. Validate code syntax and structure
terraform validate

# 3. Preview resources to be provisioned
terraform plan

# 4. Provision baseline AWS pipeline & infrastructure (type 'yes' when prompted)
terraform apply
Verification: Terraform provisions 15 baseline resources. You will see:
- One active EC2 web instance (
web) running Apache. - An Application Load Balancer (ALB).
- Active AWS CodeBuild (
infra-app-build) and AWS CodePipeline (infra-project-pipeline) resources ready to take over deployment.
Step 3: Define the CI/CD Pipeline Automation (buildspec.yml)
Create a buildspec.yml file at the root of your Git repository. AWS CodeBuild executes this script automatically inside a container whenever changes land on the master branch.
version: 0.2

env:
  variables:
    TF_VERSION: "1.9.8"
    TF_IN_AUTOMATION: "true"
    TF_INPUT: "false"
    # Update this if your Terraform files live in a subfolder (e.g., "infrastructure/prod")
    TF_WORKING_DIR: "."

phases:
  install:
    on-failure: ABORT
    commands:
      - echo "=== [INSTALL] Installing Terraform v${TF_VERSION} ==="
      - curl -sSL -o terraform.zip "https://hashicorp.com{TF_VERSION}/terraform_${TF_VERSION}_linux_amd64.zip"
      - unzip -qo terraform.zip -d /usr/local/bin/
      - rm -f terraform.zip
      - terraform --version

  pre_build:
    on-failure: ABORT
    commands:
      - echo "=== [PRE-BUILD] Initializing and Validating Terraform ==="
      - cd "${CODEBUILD_SRC_DIR}/${TF_WORKING_DIR}"
      - terraform init -no-color
      - terraform fmt -check -recursive -diff
      - terraform validate -no-color
      - echo "=== [PRE-BUILD] Generating Execution Plan ==="
      - terraform plan -out=tfplan -no-color

  build:
    on-failure: ABORT
    commands:
      - echo "=== [BUILD] Applying Verified Terraform Plan ==="
      - cd "${CODEBUILD_SRC_DIR}/${TF_WORKING_DIR}"
      - terraform apply -auto-approve -no-color tfplan

  post_build:
    commands:
      - echo "=== [POST-BUILD] Cleaning Up Plan Artifacts ==="
      - cd "${CODEBUILD_SRC_DIR}/${TF_WORKING_DIR}"
      - rm -f tfplan
Step 4: Execute the Developer GitOps Workflow (Branch & PR)
Suppose a business requirement calls for expanding web capacity by adding a second EC2 server (web2) and registering it with the ELB. Instead of running terraform apply locally, developers follow the strict GitOps merge request flow:
1. Create a Feature Branch locally
git checkout -b new-instance-request
2. Update main.tf to add one more server
Add the web2 instance definition and append its reference to the ELB resource:
# Add second EC2 instance
resource "aws_instance" "web2" {
  ami           = "ami-0c55b159cbfafe1f0"
  instance_type = "t2.micro"
  user_data     = <<-EOF
                  #!/bin/bash
                  yum update -y
                  yum install -y httpd aws-cli
                  systemctl start httpd
                  EC2_ID=$(ec2-metadata -i | cut -d ' ' -f 2)
                  echo "Page hosted on instance ID: $EC2_ID" > /var/www/html/index.html
                  EOF
}

# Update ELB to include both web instances
resource "aws_elb" "web_elb" {
  name            = "gitops-web-elb"
  subnets         = [aws_subnet.public.id]
  security_groups = [aws_security_group.elb_sg.id]
  instances       = [aws_instance.web.id, aws_instance.web2.id] # Added web2 reference

  listener {
    instance_port     = 80
    instance_protocol = "http"
    lb_port           = 80
    lb_protocol       = "http"
  }
}
3. Commit and Push to Remote Git Repository
git add main.tf buildspec.yml
git commit -m "Add new EC2 instance web2 and update ELB target group"
git push origin new-instance-request
4. Open a Pull Request / Merge Request
Navigate to AWS CodeCommit, select the new-instance-request branch, and open a Pull Request targeting the master branch.
Step 5: Code Review, Automated Deploy, & Verification
- Code Review: A release manager or senior engineer inspects the code diff in the Pull Request to verify that only approved resources (
web2) are being added. - Merge Pull Request: The reviewer approves and merges the Pull Request into
master. - Automated Pipeline Execution:
- Source Stage: AWS CodePipeline detects the commit on
masterand pulls the latest source code. - Test & Deploy Stage: AWS CodeBuild launches a container, executes
buildspec.yml, runsterraform validateas a test gate, and executesterraform apply -auto-approve.
- Source Stage: AWS CodePipeline detects the commit on
- Result Verification:
- Open your browser and navigate to the AWS ELB DNS endpoint.
- Refresh the page multiple times.
- You will observe the load balancer alternating HTTP responses between the two instance IDs (
webandweb2), confirming that your GitOps pipeline automatically deployed the new AWS infrastructure without any manual CLI execution.
Comments
Join the discussionNo comments yet. Be the first to comment.